

Tubeless Set Ups With Grannygear – Topeak – by Grannygear
Three ways to get air from Topeak.
I don’t remember ever thinking so much about bike pumps and ways to air up tires as in the last few years. Some old pumps I had for MTB riding did not even have gauges on them. It was just a calibrated thumb and off you went…close enough.
But with the advent of tubeless and with tires running lower and lower pressures, getting that right takes a bit more precision and maybe even more ‘uuumph’ from your air system, whatever that may be.
Having had faithful use from an old Topeak JoeBlow Ace (the new version would be the JoeBlow Ace DX), I asked Topeak for a couple of new floor pumps to see what might have changed over the years. As well, I requested a bigger pressurized air canister after having good results with a Milkit bottle, but thinking a bit more air volume might be a good thing.
Topeak sent out a lovely package of pumps and goodies and I have been using them for a bit now. Here we go.
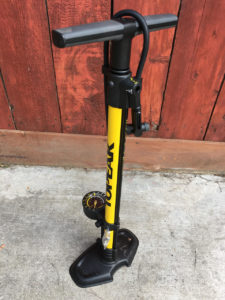
Costing 50 bucks less than the $149.95 Ace DX, the $99.95 JoeBlow Sport 2 Stage looks to bring the idea of multi-volume air delivery at a reduced cost. There is some expected compromises in that…more plastic, less metal, but it retains a sturdy and stable metal base and it has some heft to it, so its not all fluff here. The pump head has a nice, long, lever and does Presta on one side and Schrader on the other side. Its easy to install the pump head, close the valve, and then remove it. One odd thing though is that you HAVE to close the pump head valve or else air just whooshes out the other side of the pump head, so if you like pressing the pump head onto the Presta valve, forgoing closing the valve…and I do this a lot…you can’t.
The handle is easy to grab and it all feels reasonably built, although my old JoeBlow Ace is even more so. The hose is a bit short actually. I had to get very close to the bike and even then the tire valve had to be down near the bottom or it was awkward.
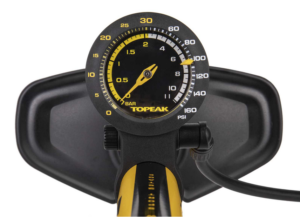
The gauge is decently big but still goes to 160psi which I just do not get. Is this for all the track bikes we own or what? [NOTE: It does make sense for charging a booster air bottle though]. Anyway, that high psi gauge reading costs valuable gauge-face real estate and scrunches things a bit. It has a two stage air volume setting, hence the name. 0-30psi and 30-160 psi are the two choices. I found the older 3 stage JoeBlow Ace I have does this part better. On the Sport 2 the 0-30 setting tries to push a good bit of air, but it seems to struggle getting it out the end of the hose fast enough. With this level of restriction, the low setting was OK, but not as good at getting a tubeless tire to set as I would have liked. And if the Presta valve is a bit clogged, the low setting takes so much pressure at the handle that I bet a smaller person would just give up. If setting a bead is not the goal, then it’s OK for airing up a low pressure tire. The higher pressure setting feels more like a ‘normal’ floor pump as far as the amount of airflow vs. effort at the handle.
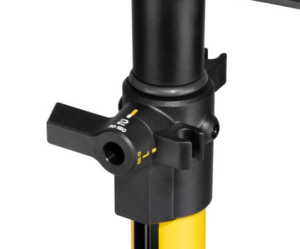
There is one other thing I noticed that could be an issue. The selector switch for the volume setting is mounted on the top/rear of the pump and is very prominent, basically ‘sticking out’. If the pump tips over and takes a hit on the garage floor, the plastic selector switch will be front and center to that action. That may not be an issue, but it looks iffy.
I am not a big fan of this pump, but it does fit the bill for a garage that has both road, gravel, and road bikes in it as it does it all. The way the pump head works (needing to be closed each time you use it), the shorter hose, and the feeling of air restriction in the low pressure setting has me less than happy, but other than that, it gets the job done.
With a smaller diameter barrel you can tell the Pro Digital is not designed to set tubeless tire beads, but that is not my priority in an all-round floor pump. What sets this one apart is the gauge…it’s not a round dial with scrunched up numbers that make you squint to see what you MIGHT be airing up your tire to. No, this is a large readout digital gauge. Oh joy!
When I tested the Silca travel pump, the one that uses that phone app to tell you the tire pressure, I thought that a regular floor pump could be really cool with a digital readout and here is one. And it is, in fact, very cool. More on that in a minute.
As far as the rest of the pump goes, it is a step up in some ways over the Sport 2 Stage. It costs more at $124.95, but has a nice long hose so you can inflate a bike tire with the bike in the stand or on a car rack, etc. The pump head is metal and has a really nice feel to it, closing and opening easily. It also allows you to NOT close it when it is on the Presta valve and you can still put air into the tire.
Handle, base, and overall build feels like the Sport 2 Stage…very adequate. The handle is quite nice to use actually.
Now then…that gauge,
Wow, is it nice to not guess at the psi in your tire! You want 58psi, not 60? Fine. It’s easy. The pump goes to sleep when you are not using it and wakes up when you pump it. Just take a stroke or two to three and then rest a second as the pressure settles and the gauge readout stabilizes. It also has a bleed button on the pump head to creep back down if you over do it. The gauge on this pump is also the first point of impact if it falls over to that side, but it does have a rubber bumper built into it to lessen shock.
I like it very much. Very much. It’s all I use now for setting final tire pressure. In fact the other morning, as we loaded up for a drive to the ride start, I actually grabbed this out of the garage to use at the parking lot rather than use the pump I always have in my car. So there you go. Spoiled, I am.
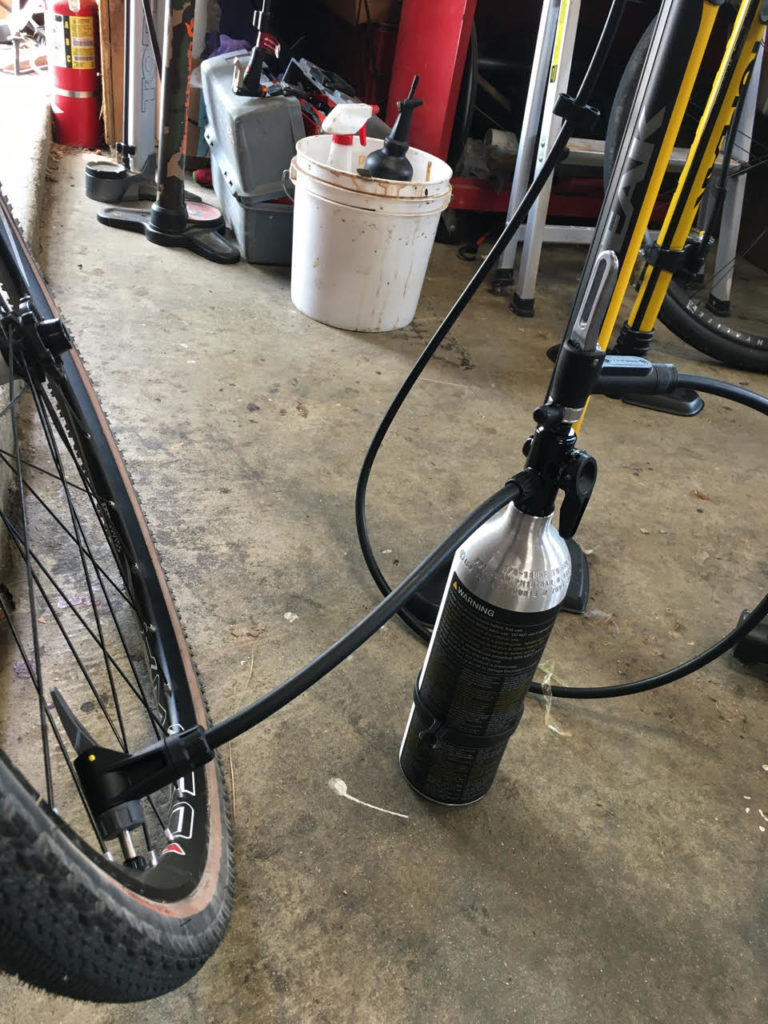
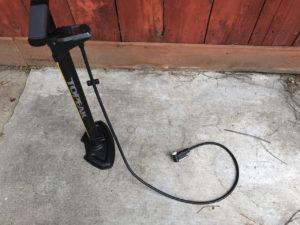
Topeak has two stand-alone inflation bottles, the Tubibooster and the Tubibooster X, Both are the same volume, but the X brings into the mix a selector valve and a hose, which, for the extra 10 bucks ($79.95 MSRP) over the non-X model, makes it a steal. I will tell you why.
The Milkit bottle I have is a smaller version of the regular Tubibooster and they are very simple in operation. Both of these are hooked to a floor pump, pressurized to 120-160 psi (as called out in the manufacturer’s specs) and then the pump is removed from the now pressurized canister. You then take the canister in hand and, with the quick dump valve on the tank, dump the air into your tubeless tire, suddenly setting the tire onto the bead seat of the rim and ‘popping’ the tire into a secure position on the rim.
Maybe.
The maybe comes into play regarding volume and pressure. The bigger the tire the more air is needed to get the tire to a pressure high enough to push the sidewalls of the tire up against the bead seat, keep them there, and then still supply enough pressure to pop the beads into place. A smaller bottle like the Milkit often falls short in this regard. It just runs out of breath on a bigger tire before the tire is often ‘set’ enough to get you going, although I have used it with success. For road, it’s a better match.
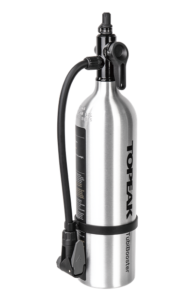
The larger Topeak Tubibooster is superior in this regard as it has higher volume and will push more air longer than the Milkit can. But what makes the Tubibooster X the king bottle in the game is this: You can keep the pump attached after the bottle is charged. After the initial air ‘dump’ has done the heavy lifting of getting the tire mostly onto the bead seat, you simply begin pumping the floor pump like normal and complete the process because now the floor pump is passing air right through the bottle and the dump valve like the bottle was not even there.…POP POP go the tire beads!
Brilliant.
Now I struggled with the ridiculously short hose on the tank which I suppose was done to keep the ‘look’ of the tank correct as the hose clips alongside it’s length. Dunno. But it is too short. I would love a coiled air hose like small air compressors use or even simply a longer rubber hose. It makes it too much of a dance with the tire, the tank, and the pump all right at your feet, keeping it all stable. Faff is the word. I wonder if the bottle uses a standard hose like floor pumps use and if so, could it be swapped? Have to play with that.
Regardless, it’s quite good at actually getting the tire to seat tubeless and that is the main thing, is it not? I just used it on a combo of a used tire (stretched bead and casing) and worn tape (divots at the spoke holes).
There was no floor pump in existence that was going to seat that tire and it was air compressor time. But, the Tubibooster X came through like a boss. Award it a silver medal. Fix that Lilliputian hose and it’s gold.
NOTE: Topeak sent out the various pump and inflation devices used in this post to Riding Gravel at no charge for test and review. We were not paid, nor bribed for this review and we strive to always give our honest thoughts and views throughout.


Topeak does sell their higher end head (the universal one) and hose as a repair/replacement item. It comes with connectors or various kinds, including hose clamps, so can be installed on many pumps, including maybe on that bottle.
Still, it really should come from the factory with a decently long hose, especially if you want to leave the pump attached.